Get a Head Start on Head Turning Valentine’s Day Treats!
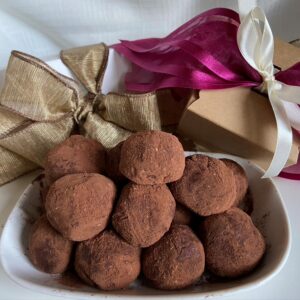
I just love chocolate! Especially melt-in-your-mouth truffles. Over the years, I’ve learned to make several kinds, and — as I always do — I’ve developed my own signature chocolates along the way (like my raspberry, pumpkin spice, and candy cane truffles). Overall, making your own truffles is surprisingly easy. It just takes a little time and patience, plus a good amount of refrigerator or freezer space (depending on the truffle). My most popular variety are dark chocolate truffles — true show-stoppers at every event. Recently, I’ve developed a habit of whipping them up as a surprise when folks use my private chef services for special occasions. The guests can’t believe that I’ve actually made truffles on the spot, and the indulgence can’t be beat, but they really are just that easy! Try it, and you’ll see.
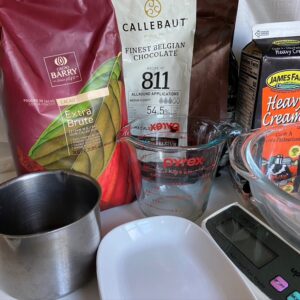
As with all recipes, the keys are sourcing the best ingredients and not cutting corners in the process. Authenticity is everything. Start with the very best dark chocolate, with a high percentage of chocolate solids. Avoid chocolate chips: these are formulated for baking and do not melt the same as other dark chocolates (side note: the chocolate pictured here is in chip form, but it is restaurant-grade and intended for melting). Both taste and texture are key here, so don’t skimp on your chocolate. Use good-quality heavy cream, and the best cocoa you can find. I prefer extra Brute for its darker color and richer taste, and the texture is perfect for even coating and light dusting. Vegans can substitute vegan chocolate and coconut milk for a wonderful result that non-vegans love just as much. Adjust the quantities as shown below, so you can use a whole can of coconut milk.
Here are the ratios for ingredients (scale up as needed):
Dark Chocolate Truffles
8 ounces best quality dark chocolate, roughly chopped (or 1 pound vegan chocolate)
1 cup heavy cream (or 15-ounce can coconut milk)
2 tablespoons sifted extra Brute cocoa (you may need more for vegan volume)
I’m usually not a stickler for weighing or perfect measurements, but in this case it matters. You want 8 ounces of chocolate by weight to 1 cup of heavy cream by volume. If you don’t have a scale, you may have to do some calculations to get a good estimate according to the total weight of the bar you use (why, oh, why does high-quality dark chocolate come in a 3.5-ounce bar? Use 2 bars, plus just a bit more than one quarter of another bar to get to 8 ounces.) A small difference in the ratio will lead to truffles that are either too stiff or too soft. But try not to stress too much: folks love them no matter what you do.
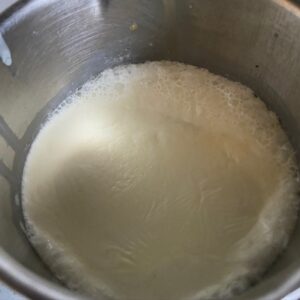
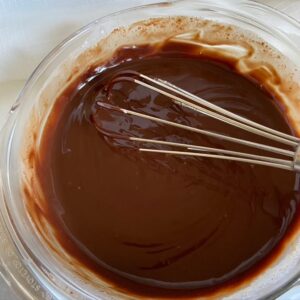
Heat your cream in a small saucepan over moderate flame, until simmering. Most recipes advise heating just until bubbles form around the edges. In my opinion, taste and texture are improved if the cream actually simmers. Be careful! Cream boils over very quickly.
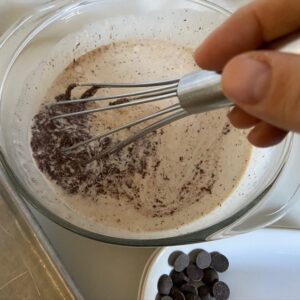
Pour the hot cream over your chopped chocolate in a heat-safe bowl that is large enough to allow stirring. Wait five minutes, while the chocolate melts. Do not rush here! You have only one chance to get this right. Whisk until smooth and shiny. If you stop here, you have a wonderful ganache. Add about one tablespoon agave to increase the shine when covering cakes. Pour directly over fully chilled and prepared cakes while the ganache is still quite warm. I use this in my flourless chocolate torte, chocolate-raspberry torte, chocolate truffle cake, and chocolate caramel and turtle cakes.
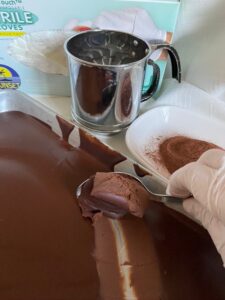
Refrigerate the ganache to chill fully. Accelerate chilling by pouring the chocolate into a flat pan, if needed. 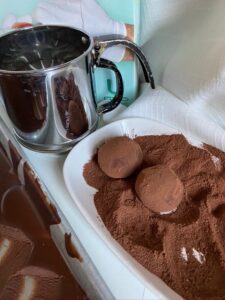 Spoon out the ganache and roll it into one-inch balls. The trick here is to start by curling the chocolate with the spoon a bit, so that you don’t have far to go into a ball. Roll very rapidly between your palms. Wear nitrile gloves, both to reduce the loss of chocolate on your hands and to slow melting. Work quickly: Smooth truffles as much as possible, but don’t linger or the chocolate will melt. As you form each truffle, roll it in the cocoa. Store in an air-tight container in the refrigerator.
Want to learn how to make more advanced truffles? I can teach you in a private or small-group lessons.
Renée Kashuba is a private chef, baker, and writer in Tarrytown. Find her online at www.foodmadebyrk.com, Instagram/foodmadebyrk, Facebook/MadeByRK, and Twitter/MadeByRK.